


The imaging principles of an optical microscope

An optical microscope is in principle a simple lens system for magnifying small objects. The first lens, called the objective, has a short focal length (a few mm), and creates an image of the object in the intermediate image plane. This image in turn can be looked at with another lens, the ocular or eye-piece, which can provide further magnification. This is illustrated in the figure on right side: Our test object, the red arrow, is located at a distance from the objective which is greater than its focal length. The objective therefore creates an enlarged (and inverted) image of the arrow in the intermediate image plain. This image is viewed through the ocular which converts the rays from the individual points of the intermediate image into bundles of parallel rays. It can be seen that the bundle corresponding to the tip of the arrow enters the eye under a large angle (with respect to the optical axis, the central symmetry axis of the imaging system). From the faint red arrow drawn close to the eye it is obvious that without the microscope it would be necessary to bring the object very close to the eye in order to achieve the same image on the retina. However, having to focus on such a close object would be very tiring (or even impossible) for the muscle which controls the eye-lens. With the aid of the microscope, on the other hand, an enlarged image of the arrow can be viewed with the eye in its fully relaxed (infinity-focused) state.
Infinity-corrected optics
In the previous paragraph we have implicitly assumed ideal imaging behavior for both the objective and the ocular lens. However, simple spherical lenses made out of ordinary dispersive glass suffer from number of imaging aberrations and cannot fulfill the requirements of the ideal lens. One achieves them approximately with combinations of spherical lenses possessing various radii of curvature, thicknesses, distances, and made out of different materials. To design well-corrected objectives and other multilens systems, special codes evaluate the imaging behavior for rays far from the optical axis in a given system of lenses. A configuration for which the individual lenses counter-balance each other’s aberrations is then sought by an iterative trial-and-error procedure.
A good objective may easily contain as much as 10 lenses, which have to be spaced with specifications as narrow as microns for some of them. The air-glass interfaces have to be anti-reflection coated to reduce reflection losses, and small gaps between the lenses are bridged with a high-index medium, usually UV-polymerizable glue, after the respective position of the lenses has been adjusted precisely. Therefore, objective lenses are expensive and sensitive optical components.
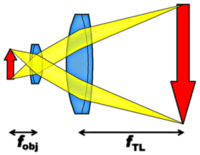
Nowadays, most objectives are infinity-corrected. This means that they are not calculated to form their image directly in the intermediate image plane, but to form an image at infinity (the object sits directly in their focal plane). Another lens, called the tube lens, then forms the intermediate image from the plane waves. This can be seen in the figure to the left; the intermediate image can then again be viewed though an ocular or sent onto a video camera etc. Some manufacturers use the tube lens to correct some of the aberrations. In that case, a combination of an objective and a matching tube lens must always be used to achieve optimum imaging quality. The advantages of infinity-corrected objectives are essential in confocal microscopy (see below), polarization studies and spectroscopy, because plane waves are easier to filter and manipulate than spherical waves (for example they are not distorted by flat windows).
Confocal fluorescence microscopy
So far we have only discussed what is called “wide-field” imaging, having always assumed that the object under study is illuminated uniformly and a “complete” image is recorded with a pixelated (spatially sensitive) detector such as the human retina, photographic film or a video camera. If we want to detect the weak signal of a single molecule it is, however, often advantageous to illuminate only a “point” of the object and image this point onto a photodetector. If the sample is moved in 3 dimensions, a 3D image can be recorded. To reduce background, i.e. to ensure that the signal arises only from the focus, a diaphragm or pinhole is inserted in one of the image planes. To scan the area to be imaged, one can move either the sample itself with piezo-electric transducers (sample scanning), or the focus by means of tilting mirrors and imaging the point of pivot onto the entrance of the objective (beam scanning).
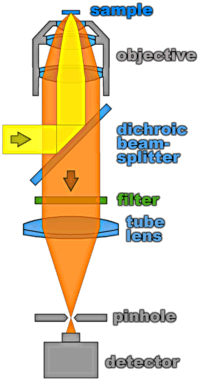
The figure on the right hand side illustrates the technique in the case of confocal fluorescence microscopy: The same objective is used to both focus the excitation laser (symbolized by the yellow beam) and collect the fluorescence emitted from the sample (orange). Spectral filters which separate the excitation light from the red-shifted fluorescence can be used conveniently in the infinity-region between the objective and the tube lens. These filters are multilayer structures of dielectric materials with different indices of refraction. The thicknesses of the layers can be chosen such that the beams reflected at each interface interfere constructively for the laser wavelength which will then be reflected efficiently by the overall structure. For the fluorescence emission, on the other hand, this interference is largely destructive so that most of it is transmitted through the filter. The dichroic beamsplitter satisfies the same conditions for an angle of incidence of 45 degrees. The tube lens focuses the transmitted beam onto a pinhole which – if its size is chosen properly – blocks all light not originating form the (nearly) diffraction limited focus. This technique can easily be extended to single-molecule sensitivity if high quality filters and a sensitive detector are used (more on that in the next chapter).
Near-field optics
To improve the resolution of optical microscopic images, and to reduce the selected volume in single-molecule studies, it would be of great advantage to reduce the spot size below the Abbe diffraction limit. Optics at ranges smaller than the wavelength is called near-field optics. To produce and analyze optical fields with variations less than lambda, interaction with microscopic objects is necessary. Near-field optics thus has to use small objects, usually tips, to enhance or constrain the optical field. It has therefore much in common with scanning probe microscopies (STM and AFM): The scanning procedure, the importance of the tip, the stability requirements; however, the slow spatial variations of the optical field make it much more difficult to interpret and model the images obtained.
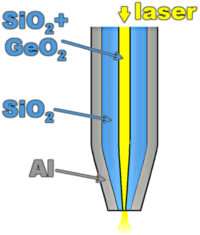
A common way to confine the optical field is to stretch an optical fiber, so as to obtain a conical tip, and to coat it with a thin, but opaque metal layer, usually aluminium. The end of the fiber is uncoated, and is therefore a small pinhole through which an evanescent light wave can pass. The diameter of the hole is often 50-100 nm. The transmission decreases very rapidly with diameter, approximately like the 6th power for small sizes. A scanning near-field optical microscope (SNOM) can be used in excitation (via the fiber) or detection (or pick-up) mode. To detect fluorescent single molecules, it is important not to irradiate the sample too long, therefore the excitation mode is preferable. The tip is scanned across the sample, and the total fluorescence is collected by auxiliary optics (a microscope objective) as a function of tip position. While scanning, the distance between tip and surface must be kept constant. Several methods can be used, among which shear-force AFM is very common. To detect the weak force from the substrate, the tip is glued to a tuning fork. The presence of the surface manifests itself by a shift and broadening of the fork’s resonance. The phase of the oscillation can also be used as error signal for the stabilization of the tip’s altitude.
A SNOM gives in principles access to spatial resolutions less than 100 nm; however, the operation of a SNOM is much more demanding than that of a far-field confocal microscope and in many cases, particulary in single-molecule studies, the increase in resolution does not justify the necessary additional effort. Moreover, low temperatures are even more difficult, and fluorescent objects below the surface cannot be accessed in near-field.